Min-Cut Based Segmentation
In this tutorial we will learn how to use the min-cut based segmentation algorithm implemented in the pcl::MinCutSegmentation class.
This algorithm makes a binary segmentation of the given input cloud. Having objects center and its radius the algorithm divides the cloud on two sets:
foreground and background points (points that belong to the object and those that do not belong).
Theoretical Primer
The idea of this algorithm is as follows:
For the given point cloud algorithm constructs the graph that contains every single point of the cloud as a set of vertices and two more vertices called source and sink. Every vertex of the graph that corresponds to the point is connected with source and sink with the edges. In addition to these, every vertex (except source and sink) has edges that connect the corresponding point with its nearest neighbours.
Algorithm assigns weights for every edge. There are three different types of weight. Let’s examine them:
First of all it assigns weight to the edges between clouds points. This weight is called smooth cost and is calculated by the formula:
Here
is the distance between points. The farther away the points are, the more is probability that the edge will be cut.
Next step the algorithm sets data cost. It consists of foreground and background penalties. The first one is the weight for those edges that connect clouds points with the source vertex and has the constant user-defined value. The second one is assigned to the edges that connect points with the sink vertex and is calculated by the formula:
Here
is the distance to the expected center of the object in the horizontal plane:
Radius that occurs in the formula is the input parameter for this algorithm and can be roughly considered as the range from objects center outside of which there are no points that belong to foreground (objects horizontal radius).
After all the preparations the search of the minimum cut is made. Based on an analysis of this cut, cloud is divided on foreground and background points.


For more comprehensive information please refer to the article “Min-Cut Based Segmentation of Point Clouds”.
The code
First of all you will need the point cloud for this tutorial.
This is a good one for the purposes of the algorithm.
Next what you need to do is to create a file min_cut_segmentation.cpp in any editor you prefer and copy the following code inside of it:
 1#include <iostream>
 2#include <vector>
 3#include <pcl/io/pcd_io.h>
 4#include <pcl/point_types.h>
 5#include <pcl/visualization/cloud_viewer.h>
 6#include <pcl/filters/filter_indices.h> // for pcl::removeNaNFromPointCloud
 7#include <pcl/segmentation/min_cut_segmentation.h>
 8
 9int main ()
10{
11  pcl::PointCloud <pcl::PointXYZ>::Ptr cloud (new pcl::PointCloud <pcl::PointXYZ>);
12  if ( pcl::io::loadPCDFile <pcl::PointXYZ> ("min_cut_segmentation_tutorial.pcd", *cloud) == -1 )
13  {
14    std::cout << "Cloud reading failed." << std::endl;
15    return (-1);
16  }
17
18  pcl::IndicesPtr indices (new std::vector <int>);
19  pcl::removeNaNFromPointCloud(*cloud, *indices);
20
21  pcl::MinCutSegmentation<pcl::PointXYZ> seg;
22  seg.setInputCloud (cloud);
23  seg.setIndices (indices);
24
25  pcl::PointCloud<pcl::PointXYZ>::Ptr foreground_points(new pcl::PointCloud<pcl::PointXYZ> ());
26  pcl::PointXYZ point;
27  point.x = 68.97;
28  point.y = -18.55;
29  point.z = 0.57;
30  foreground_points->points.push_back(point);
31  seg.setForegroundPoints (foreground_points);
32
33  seg.setSigma (0.25);
34  seg.setRadius (3.0433856);
35  seg.setNumberOfNeighbours (14);
36  seg.setSourceWeight (0.8);
37
38  std::vector <pcl::PointIndices> clusters;
39  seg.extract (clusters);
40
41  std::cout << "Maximum flow is " << seg.getMaxFlow () << std::endl;
42
43  pcl::PointCloud <pcl::PointXYZRGB>::Ptr colored_cloud = seg.getColoredCloud ();
44  pcl::visualization::CloudViewer viewer ("Cluster viewer");
45  viewer.showCloud(colored_cloud);
46  while (!viewer.wasStopped ())
47  {
48  }
49
50  return (0);
51}
The explanation
Now let’s study out what is the purpose of this code. First few lines will be omitted, because they are obvious.
  pcl::PointCloud <pcl::PointXYZ>::Ptr cloud (new pcl::PointCloud <pcl::PointXYZ>);
  if ( pcl::io::loadPCDFile <pcl::PointXYZ> ("min_cut_segmentation_tutorial.pcd", *cloud) == -1 )
  {
    std::cout << "Cloud reading failed." << std::endl;
    return (-1);
  }
These lines are simply loading the cloud from the .pcd file.
  pcl::IndicesPtr indices (new std::vector <int>);
  pcl::removeNaNFromPointCloud(*cloud, *indices);
The purpose of these lines is to show that pcl::MinCutSegmentation class can work with indices. Here, only the valid points are chosen for segmentation.
pcl::MinCutSegmentation<pcl::PointXYZ> seg;
Here is the line where the instantiation of the pcl::MinCutSegmentation class takes place.
It is the template class that has only one parameter - PointT - which says what type of points will be used.
  seg.setInputCloud (cloud);
  seg.setIndices (indices);
These lines provide the algorithm with the cloud that must be segmented and the indices.
  pcl::PointCloud<pcl::PointXYZ>::Ptr foreground_points(new pcl::PointCloud<pcl::PointXYZ> ());
  pcl::PointXYZ point;
  point.x = 68.97;
  point.y = -18.55;
  point.z = 0.57;
  foreground_points->points.push_back(point);
  seg.setForegroundPoints (foreground_points);
As mentioned before, algorithm requires point that is known to be the objects center. These lines provide it.
  seg.setSigma (0.25);
  seg.setRadius (3.0433856);
These lines set  and objects radius required for smooth cost calculation.
seg.setNumberOfNeighbours (14);
This line tells how much neighbours to find when constructing the graph. The more neighbours is set, the more number of edges it will contain.
seg.setSourceWeight (0.8);
Here is the line where foreground penalty is set.
  std::vector <pcl::PointIndices> clusters;
  seg.extract (clusters);
These lines are responsible for launching the algorithm. After the segmentation clusters will contain the result.
std::cout << "Maximum flow is " << seg.getMaxFlow () << std::endl;
You can easily access the flow value that was computed during the graph cut. This is exactly what happening here.
  pcl::PointCloud <pcl::PointXYZRGB>::Ptr colored_cloud = seg.getColoredCloud ();
  pcl::visualization::CloudViewer viewer ("Cluster viewer");
  viewer.showCloud(colored_cloud);
  while (!viewer.wasStopped ())
  {
  }
These lines simply create the instance of CloudViewer class for result visualization.
Compiling and running the program
Add the following lines to your CMakeLists.txt file:
1cmake_minimum_required(VERSION 3.5 FATAL_ERROR)
2
3project(min_cut_segmentation)
4
5find_package(PCL 1.5 REQUIRED)
6
7add_executable (min_cut_segmentation min_cut_segmentation.cpp)
8target_link_libraries (min_cut_segmentation ${PCL_LIBRARIES})
After you have made the executable, you can run it. Simply do:
$ ./min_cut_segmentation
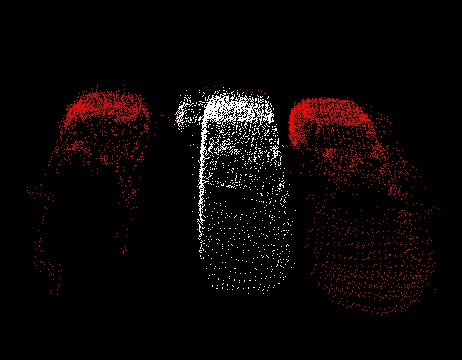
After the segmentation the cloud viewer window will be opened and you will see something similar to those images: