Detecting people and their poses using PointCloud Library
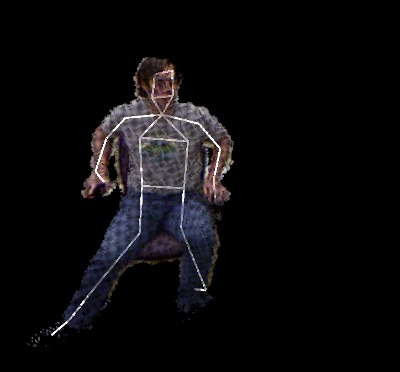
In this tutorial we will learn how detect a person and its pose in a pointcloud. This is based on work from Koen Buys, Cedric Cagniart, Anatoly Bashkeev and Caroline Pantofaru, this has been presented on ICRA2012 and IROS2012 and an official reference for a journal paper is in progress. A coarse outline of how it works can be seen in the following video.
This shows how to detect people with an Primesense device, the full version working on oni and pcd files can be found in the git master. The code assumes an organised and projectable pointcloud, and should work with other sensors then the Primesense device.
In order to run the code you’ll need a decent Nvidia GPU with Fermi or Kepler architecture, have a look at the GPU installation tutorial to get up and running with your GPU installation.
The code
The full version of this code can be found in PCL gpu/people/tools, the following is a reduced version for the tutorial. This version can be found in doc/tutorials/content/sources/gpu/people_detect.
The explanation
Now, let’s break down the code piece by piece. Starting from the main routine.
int main(int argc, char** argv)
{
  // selecting GPU and printing info
  int device = 0;
  pc::parse_argument (argc, argv, "-gpu", device);
  pcl::gpu::setDevice (device);
  pcl::gpu::printShortCudaDeviceInfo (device);

  // selecting data source
  pcl::Grabber::Ptr capture (new pcl::OpenNIGrabber());

  //selecting tree files
  std::vector<std::string> tree_files;
  tree_files.push_back("Data/forest1/tree_20.txt");
  tree_files.push_back("Data/forest2/tree_20.txt");
  tree_files.push_back("Data/forest3/tree_20.txt");
  tree_files.push_back("Data/forest4/tree_20.txt");

  pc::parse_argument (argc, argv, "-tree0", tree_files[0]);
  pc::parse_argument (argc, argv, "-tree1", tree_files[1]);
  pc::parse_argument (argc, argv, "-tree2", tree_files[2]);
  pc::parse_argument (argc, argv, "-tree3", tree_files[3]);

  int num_trees = (int)tree_files.size();
  pc::parse_argument (argc, argv, "-numTrees", num_trees);

  tree_files.resize(num_trees);
  if (num_trees == 0 || num_trees > 4)
    return std::cout << "Invalid number of trees" << std::endl, -1;

  try
  {
    // loading trees
    typedef pcl::gpu::people::RDFBodyPartsDetector RDFBodyPartsDetector;
    RDFBodyPartsDetector::Ptr rdf(new RDFBodyPartsDetector(tree_files));
    PCL_INFO("Loaded files into rdf");

    // Create the app
    PeoplePCDApp app(*capture);
    app.people_detector_.rdf_detector_ = rdf;

    // executing
    app.startMainLoop ();
  }
  catch (const pcl::PCLException& e) { std::cout << "PCLException: " << e.detailedMessage() << std::endl; }
  catch (const std::runtime_error& e) { std::cout << e.what() << std::endl; }
  catch (const std::bad_alloc& /*e*/) { std::cout << "Bad alloc" << std::endl; }
  catch (const std::exception& /*e*/) { std::cout << "Exception" << std::endl; }

  return 0;
}
First the GPU device is set, by default this is the first GPU found in the bus, but if you have multiple GPU’s in your system, this allows you to select a specific one. Then a OpenNI Capture is made, see the OpenNI Grabber tutorial for more info on this. (TODO add link)
  std::vector<std::string> tree_files;
  tree_files.push_back("Data/forest1/tree_20.txt");
  tree_files.push_back("Data/forest2/tree_20.txt");
  tree_files.push_back("Data/forest3/tree_20.txt");
  tree_files.push_back("Data/forest4/tree_20.txt");

  pc::parse_argument (argc, argv, "-tree0", tree_files[0]);
  pc::parse_argument (argc, argv, "-tree1", tree_files[1]);
  pc::parse_argument (argc, argv, "-tree2", tree_files[2]);
  pc::parse_argument (argc, argv, "-tree3", tree_files[3]);
The implementation is based on a similar approach as Shotton et al. and thus needs off-line learned random decision forests for labeling. The current implementation allows up to 4 decision trees to be loaded into the forest. This is done by giving it the names of the text files to load.
  int num_trees = (int)tree_files.size();
  pc::parse_argument (argc, argv, "-numTrees", num_trees);
An additional parameter allows you to configure the number of trees to be loaded.
    typedef pcl::gpu::people::RDFBodyPartsDetector RDFBodyPartsDetector;
    RDFBodyPartsDetector::Ptr rdf(new RDFBodyPartsDetector(tree_files));
    PCL_INFO("Loaded files into rdf");
Then the RDF object is created, loading the trees upon creation.
    // Create the app
    PeoplePCDApp app(*capture);
    app.people_detector_.rdf_detector_ = rdf;

    // executing
    app.startMainLoop ();
Now we create the application object, give it the pointer to the RDF object and start the loop. Now we’ll have a look at the main loop.
    void
    startMainLoop ()
    {
      cloud_cb_ = false;

      PCDGrabberBase* ispcd = dynamic_cast<pcl::PCDGrabberBase*>(&capture_);
      if (ispcd)
        cloud_cb_= true;

      typedef openni_wrapper::DepthImage::Ptr DepthImagePtr;
      typedef openni_wrapper::Image::Ptr ImagePtr;

      std::function<void (const PointCloud<PointXYZRGBA>::ConstPtr&)> func1 = [this] (const PointCloud<PointXYZRGBA>::ConstPtr& cloud) { source_cb1 (cloud); };
      std::function<void (const ImagePtr&, const DepthImagePtr&, float)> func2 = [this] (const ImagePtr& img, const DepthImagePtr& depth, float constant)
      {
        source_cb2 (img, depth, constant);
      };
      boost::signals2::connection c = cloud_cb_ ? capture_.registerCallback (func1) : capture_.registerCallback (func2);

      {
        std::unique_lock<std::mutex> lock(data_ready_mutex_);

        try
        {
          capture_.start ();
          while (!exit_ && !final_view_.wasStopped())
          {
            bool has_data = (data_ready_cond_.wait_for(lock, 100ms) == std::cv_status::no_timeout);
            if(has_data)
            {
              SampledScopeTime fps(time_ms_);

              if (cloud_cb_)
                process_return_ = people_detector_.process(cloud_host_.makeShared());
              else
                process_return_ = people_detector_.process(depth_device_, image_device_);

              ++counter_;
            }

            if(has_data && (process_return_ == 2))
              visualizeAndWrite();
          }
          final_view_.spinOnce (3);
        }
        catch (const std::bad_alloc& /*e*/) { std::cout << "Bad alloc" << std::endl; }
        catch (const std::exception& /*e*/) { std::cout << "Exception" << std::endl; }

        capture_.stop ();
      }
      c.disconnect();
    }
This routine first connects a callback routine to the grabber and waits for valid data to arrive. Each time the data arrives it will call the process function of the people detector, this is a fully encapsulated method and will call the complete pipeline. Once the pipeline completed processing, the results can be fetched as public structs or methods from the people detector object. Have a look at doc.pointclouds.org for more documentation on the available structs and methods. The visualizeAndWrite method will illustrate one of the available methods of the people detector object:
    void
    visualizeAndWrite(bool write = false)
    {
      const PeopleDetector::Labels& labels = people_detector_.rdf_detector_->getLabels();
      people::colorizeLabels(color_map_, labels, cmap_device_);

      int c;
      cmap_host_.width = cmap_device_.cols();
      cmap_host_.height = cmap_device_.rows();
      cmap_host_.resize(cmap_host_.width * cmap_host_.height);
      cmap_device_.download(cmap_host_.points, c);

      final_view_.showRGBImage<pcl::RGB>(cmap_host_);
      final_view_.spinOnce(1, true);

      if (cloud_cb_)
      {
        depth_host_.width = people_detector_.depth_device1_.cols();
        depth_host_.height = people_detector_.depth_device1_.rows();
        depth_host_.resize(depth_host_.width * depth_host_.height);
        people_detector_.depth_device1_.download(depth_host_.points, c);
      }

      depth_view_.showShortImage(&depth_host_[0], depth_host_.width, depth_host_.height, 0, 5000, true);
      depth_view_.spinOnce(1, true);

      if (write)
      {
        if (cloud_cb_)
          savePNGFile(make_name(counter_, "ii"), cloud_host_);
        else
          savePNGFile(make_name(counter_, "ii"), rgba_host_);
        savePNGFile(make_name(counter_, "c2"), cmap_host_);
        savePNGFile(make_name(counter_, "s2"), labels);
        savePNGFile(make_name(counter_, "d1"), people_detector_.depth_device1_);
        savePNGFile(make_name(counter_, "d2"), people_detector_.depth_device2_);
      }
    }
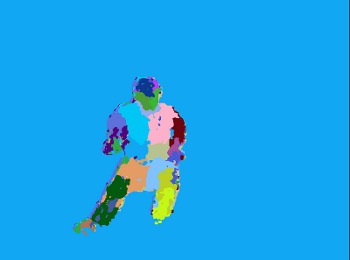
Line 143 calls the RDF getLabels method which returns the labels on the device, these however are a discrete enum of the labels and are visually hard to recognize, so these are converted to colors that illustrate each body part in line 144. At this point the results are still stored in the device memory and need to be copied to the CPU host memory, this is done in line 150. Afterwards the images are shown and stored to disk.
Compiling and running the program
Add the following lines to your CMakeLists.txt file:
 1cmake_minimum_required(VERSION 3.5 FATAL_ERROR)
 2
 3project(people_detect)
 4
 5find_package(PCL 1.7 REQUIRED)
 6
 7#Searching CUDA
 8find_package(CUDA)
 9
10#Include the FindCUDA script
11include(FindCUDA)
12
13cuda_add_executable (people_detect src/people_detect.cpp)
14target_link_libraries (people_detect ${PCL_LIBRARIES})
- After you have made the executable, you can run it. Simply do:
$ ./people_detect